This article is deprecated! Any technical information refers to software versions that are now obsolete. Please visit the DIYthemes Blog for current updates, or check out the old Thesis Blog for a treasure trove of website marketing insights.
Actually, this article is **partially** deprecated. It is now possible to paste your ad code directly into Thesis Text Boxes, and then you can place these Text Boxes wherever you want within your design.
If you run a website, you likely want to include ads of some kind in your template.
The problem is, where do you place your ads and how do you get them there?
In this article, I’ll show you the most popular places to include ads…
…and then give you the code to include those ads in your Thesis WordPress Theme!
How to Include Six 125×125 Ads in the Multimedia Box
Ever stumble upon a group of six 125×125 ads? It’s often arranged in a grid pattern and is popular among advertisers. If you want to include this in your Thesis WordPress Theme, it’s easy with the Multimedia Box. In the steps below, I’ll show you how it’s done.
Step 1: Upload Ad Tile Images
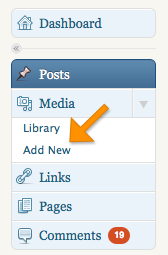
Assuming you set your uploaded images to be organized by year and month (this is the default), go to your WordPress administration panel, and then click on Media → Add New in the navigation menu on the left-hand side (click here for an image). This is where you can upload your ad images. Once completing that, continue to Step 2.
Step 2: Include Custom Code in Multimedia Box
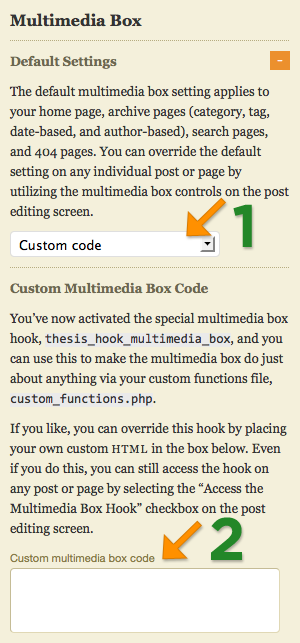
Go to Design Options → Multimedia Box. When there, you’ll need to expand Default Settings to reveal the dropdown list, and then select Custom Code (click here for an image).
The Custom Multimedia Box Code field will display, and you should place the following code in this field. However, before saving, you need to replace our default ad images with the URL of the ad images on your server.
<div class="adblock">
    <a href="http://www.adlink1.com/"><img src="../wp-content/uploads/2010/07/ad_125_1.png" width="125" height="125" alt="ad image 1" /></a>
    <a href="http://www.adlink2.com/"><img src="../wp-content/uploads/2010/07/ad_125_2.png" width="125" height="125" alt="ad image 2" /></a>
    <a href="http://www.adlink3.com/"><img src="../wp-content/uploads/2010/07/ad_125_3.png" width="125" height="125" alt="ad image 3" /></a>
</div>
<div class="adblock">
    <a href="http://www.adlink4.com/"><img src="../wp-content/uploads/2010/07/ad_125_4.png" width="125" height="125" alt="ad image 4" /></a>
    <a href="http://www.adlink5.com/"><img src="../wp-content/uploads/2010/07/ad_125_5.png" width="125" height="125" alt="ad image 5" /></a>
    <a href="http://www.adlink6.com/"><img src="../wp-content/uploads/2010/07/ad_125_6.png" width="125" height="125" alt="ad image 6" /></a>
</div>
Step 3: Apply Necessary Styling to custom.css
Like before, you’ll need to paste some code. This time, you’ll need to load up your Thesis File Editor (click here for an image) and paste the following code in your custom.css file:
.custom .adblock {
    text-align: center;
}
.custom .adblock img {
    padding: 4px;
    background-color: #FFFFFF;
    display: inline;
}
What would this look like on a Thesis Theme website? Check out Figure 1 below:

Figure 1: Six 125×125 ads—you can add these into your Thesis website with the above code.
What if you wanted your ad box to look different?
Well, that’s possible too!
For example, if you wish to remove the background color from the Multimedia Box and spread out the ads to take advantage of white space, you could apply the following code to your custom.css:
.custom #multimedia_box {
    padding: 0;
}
.custom .custom_box {
    background: none;
}
.custom .adblock {
    text-align: center;
}
.custom .adblock img {
    display: inline;
    padding: 15px;
}
And what would that look like? See Figure 2 below:

Figure 2: See how there’s more white space in this ad box? This is great for minimalist Thesis mods.
How to Include Banner Ads in Your Content Column
Most banner advertisements are wide, but relatively short, unless dealing with skyscraper-style ads. For example, this is a half-leaderboard:

Figure 3. A half-leaderboard ad in standard 468×60 format.
In this portion of the tutorial, I’ll show you how to place this type of advertisement in your main content column, which is a traditional location to include advertising because of its high visibility.
How to Include a Banner Ad in the Content Column
If you use the following code, your Thesis banner ad will be placed at the bottom of your content column (right below the previous/next links if you have those enabled). All you have to do is paste it in your custom_functions.php file.
function after_content_ad() {
?>
<div class="advert"><a href="https://diythemes.com/"><img src="https://diythemes.com/thesis/wp-content/uploads/2010/08/thesis-468x60.png" width="468" height="60" /></a></div>
<?php
}
add_action('thesis_hook_after_content', 'after_content_ad');
Did you notice that I wrapped the ad code inside of a div and have given that div a class named advert? I did this so that, if the need arises, you can add styling to your ad box (for example, a border, maybe?) by adding CSS in your custom.css file.
How to Include an Ad After a Post
Personally, this is one of my favorite ad positions because of its tendency to convert much better than other spots. To include an ad right after a post, paste the following code in your custom_functions.php file:
function after_post_ad() {
?>
<div class="advert"><a href="https://diythemes.com/"><img src="https://diythemes.com/thesis/wp-content/uploads/2010/08/thesis-468x60.png" width="468" height="60" /></a></div>
<?php
}
add_action('thesis_hook_after_post_box', 'after_content_ad');
Let’s say you want to display an ad only after the first featured post on the homepage. To do that, you’ll need to use the $post_count property, but don’t worry, it’s easy. Paste the following into your custom_functions.php file:
function after_first_post_ad($post_count) {
    if (is_home()) {
        if ($post_count == 1) { ?>
<div class="advert"><a href="https://diythemes.com/"><img src="https://diythemes.com/thesis/wp-content/uploads/2010/08/thesis-468x60.png" width="468" height="60" /></a></div>
<?php
        }
    }
}
add_action('thesis_hook_after_post', 'after_first_post_ad');
How to Include an Ad On Single Post Pages
If you thought I loved ads below featured posts, I’m in complete admiration of ads after the single post. For starters, most blogs have much of their traffic hit single post pages. This happens because of direct links and search engines.
Think about it for a second: When you include an ad at the end of a post, one of the highest converting spots on a page, combined with the highest-traffic pages—your single post pages—you can make decent money.
Sound good? Here’s how you do it. Just paste the following code in your custom_functions.php file:
function single_post_ad() {
    if (is_single()) { ?>
<div class="advert"><a href="http://www.diythemes.com/"><img src="https://diythemes.com/thesis/wp-content/uploads/2010/08/thesis-468x60.png" width="468" height="60" /></a></div>
<?php
    }
}
add_action('thesis_hook_after_post_box', 'single_post_ad');
Now, what if you wanted your ad to display on one single post but not another? How would you do that?
In WordPress, there’s something called a post slug. WordPress will generate a post slug for you by default, and if you’re using pretty permalinks, you’ll have the ability to change this post slug to something concise and memorable, as shown in Figure 4:

Figure 4. A custom post slug (code-sample) in the WordPress post editing interface.
You can use this post slug to target specific articles and, by extension, to serve ads on any post or page you like. For instance, if you wanted to target an article with the post slug slug-example, you’d paste this code in your custom_functions.php file:
function single_post_ad() {
    if (is_single('slug-example')) { ?>
<div class="advert"><a href="https://diythemes.com/"><img src="https://diythemes.com/thesis/wp-content/uploads/2010/08/thesis-468x60.png" width="468" height="60" /></a></div>
<?php
    }
}
add_action('thesis_hook_after_post_box', 'single_post_ad');
How to Include an Ad On a WordPress Page
Similar to ads on single post pages, it’s also possible to place a particular ad on all static pages. To do that, paste the following code in your custom_functions.php file:
function page_ad() {
    if (is_page()) { ?>
<div class="advert"><a href="https://diythemes.com/"><img src="https://diythemes.com/thesis/wp-content/uploads/2010/08/thesis-468x60.png" width="468" height="60" /></a></div>
<?php
    }
}
add_action('thesis_hook_after_post_box', 'page_ad');
As in the single posts example above, you may place a certain ad on a particular page. You may also use an array with your conditional to place an ad on several selected pages; for example, let’s say that you’d like to target the pages with slugs foo and bar:
function page_ad() {
    if (is_page(array('foo', 'bar')) { ?>
<div class="advert"><a href="https://diythemes.com/"><img src="https://diythemes.com/thesis/wp-content/uploads/2010/08/thesis-468x60.png" width="468" height="60" /></a></div>
<?php
    }
}
add_action('thesis_hook_after_post_box', 'page_ad');
How to Include an Ad in Your Thesis Header
Many people place horizontal ads in their header because it’s above the fold and affords maximum visibility. To do this, paste the following code in your custom_functions.php file:
function header_ad() {
?>
<div class="advert"><a href="https://diythemes.com/"><img src="https://diythemes.com/thesis/wp-content/uploads/2010/08/thesis-468x60.png" width="468" height="60" /></a></div>
<?php
}
add_action('thesis_hook_header', 'header_ad');
In most cases, further adjustments are necessary to position the ad in your desired location. For example, you may wish to set the ad opposite of your site’s text logo and tagline, or perhaps, above the logo.
Fortunately, since we wrapped your ad code within a div with a named class, you can edit these styles very easily. To play around with positioning, paste this code in your custom.css file:
.custom .advert {
    margin: -70px 0 70px 400px;
}
The question is, how do you make this code move your ad? Well, a large left margin will push the ad to the side of the header opposite the logo and tagline, whereas a negative top margin will pull the ad image up to whatever height you desire. Either way, you can play with it—it’s easy to learn once you start tweaking!
How to Include Ads in Your WordPress Sidebar
 Placing ads in your blog’s sidebar is simple. When you load up your Widgets panel, you may drag a text widget to the sidebar of your choice, paste the ad code into your widget, and click Save.
However, what if you want your widget to appear under specific conditions? Doing that from the widget interface can be daunting.
Sure, there are plugins like Widget Logic by Alan Trewartha that work for this task, but with Thesis, you can avoid using the plugin altogether!
Just as we demonstrated earlier with code for placing ads in the content column, you can use functions and hooks to position ads on specific pages or posts. However, the main difference is the hook you use for ad placement.
For example, in the following code, the hook thesis_hook_before_sidebar_1 places the ad before other content in Sidebar 1:
function sidebar_one_ad() {
?>
<div class="advert"><a href="https://diythemes.com/"><img src="https://diythemes.com/thesis/wp-content/uploads/2010/08/sidebar-ad.png" width="175" height="245" /></a></div>
<?php
}
add_action('thesis_hook_before_sidebar_1', 'sidebar_one_ad');
Then, as you might have guessed, the hook thesis_hook_after_sidebar_1 will position the ad after other content in the sidebar. Additionally, all of these hooks work for your second sidebar too. The only difference is, instead of using thesis_hook_after_sidebar_1, you would use thesis_hook_after_sidebar_2.
