This document is deprecated! The information on this page refers to a Thesis version that is now obsolete. Please visit the Thesis Docs for current documentation.
Thesis comes equipped with a wide array of styles that you can use to improve the presentational quality of your blog posts. Follow this style guide to enhance the readability of your content and to add a professional flair that will set you apart from the crowd!
Sub-Headlines
Producing highly scannable content is probably the greatest courtesy you can extend to your readers, and fortunately, it’s also one of the most effective ways to engage people’s attention when they visit your site. The question becomes, then, what can you do to make your content more scannable?
For starters, you can incorporate the use of sub-headlines to separate your posts into smaller sections that are more easily-digestible for readers. There are a couple of easy ways to insert sub-headlines into your posts, so let’s look at those now.

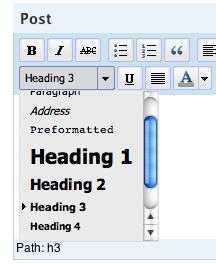
Figure 1. Select Heading 3 from the dropdown formatting menu
First, if you’re using the visual text editor, you can simply select Heading 3 from the formatting dropdown list, as shown in Figure 1. Please note that you must choose Heading 3 specifically; choosing any other heading will produce undesirable results. Furthermore, please be sure that you do not choose Heading 1 or Heading 2—those have been reserved only for post titles and should not be used within posts themselves.
Another way to insert a sub-headline is to switch to the HTML editor, and then simply encode your headline in <h3> tags, like so:
<h3>My Headline Text</h3>
Using either method will produce the desired result, so try whichever one you prefer!
Drop Caps
Want to add some scholarly flair to your blog posts? Try implementing drop caps, which look like the “W” you see at the beginning of this paragraph. Thesis comes equipped with a pre-defined drop cap style, so all you have to do is input the necessary code in your blog post to make it happen. Here’s how it works:
First, you’ll need to switch to the HTML editor by clicking on the “HTML” link in the upper right corner of your Posting area, as shown in Figure 2 below.

Figure 2. Click the HTML tab to access the WordPress HTML editor
Second, you’ll need to wrap the letter you want to turn into a drop cap with the appropriate HTML. In the following example, the code you would actually add inside the HTML editor is highlighted for clarity:
<span class="drop_cap">T</span>his is my paragraph. The "T" is my drop cap.
Notes and Alerts
Every now and again, you may find it necessary to draw special attention to a paragraph (or even just a few words) of text. As you might have guessed, Thesis contains a couple of pre-defined styles that can help you out in this department, and all you have to do is implement them by way of the HTML editor.
The first special paragraph style is a Note, which looks like this:
This is a note—check out the default styling!
To create a note, simply access your HTML editor (as in Figure 2), and insert the following highlighted code:
<p class="note">Your note text goes here!</p>
The second special paragraph style is an Alert, which you may wish to use for text that you really want your readers to notice. It looks like this:
Hey! Don’t miss out on this handy paragraph style!
Creating an alert is identical to creating a note, except that you’ll use the alert class instead of the note class, like so:
<p class="alert">Your alert text goes here!</p>
In-post Ad Placements
At some point, you may wish to incorporate an ad within the body of a post, and if you want it to perform as effectively as possible, you’re going to need an easy, clean way to integrate it into the layout. Naturally, Thesis comes equipped with ad handling styles that will make this a simple task—ya just gotta know how to use ’em!
For the sake of this example, let’s assume that you’re using the AdSense Deluxe Plugin to insert your JavaScript ad code.
To begin, dive into the HTML editor (see Figure 2), and select the position within your post where you’d like your ad to appear.
Now, if you’d like your ad to appear on the right with text wrapped around it, you would insert this code:
<div class="ad"><!‐‐adsense‐‐></div>
If you’d like your ad on the left with text wrapped around it, you would use this code instead:
<div class="ad_left"><!‐‐adsense‐‐></div>
Pay careful attention to the size of the ad units that you attempt to place within the content area of your site. The two ad handling styles introduced above work best with ads that are 250px wide or less. If you really want to stretch things, you can probably get away with up to 300px wide (Google’s Medium Rectangle, for example), but I would never recommend going any wider than that if you’re trying to wrap the text around the ad unit.
Oh, and if you don’t want to wrap text around an ad unit, simply place the ad code between paragraph (<p>) tags. By default, Thesis’ content column is 480px wide, so you’ll be able to accommodate ad units up to that width.