After installing the Promo Skin, you’ll need to set up a few items to adapt the Skin to your site. To begin, visit the Skin Content page (Thesis Admin → Skin → Skin Content) and locate the Promo Skin Content links.
Navigation Menu
Locate and then click the Nav Menu link, and on the ensuing page, you’ll be able to choose a WordPress navigation menu.
Please note that if you have not yet created a menu, your WordPress pages will show by default. Generally, this results in an ugly menu, so we recommend creating one now by visiting Appearance → Menus in your WordPress dashboard.
Promo Bar and Promo Text
The promo bar offers you a stylish and effective way to draw attention to special content in a high-visibility area of your site (directly beneath the header).

Out of the box, the promo bar contains text that you can edit by clicking on the Promo Text link in the Promo Skin Content list. Simply replace the default text with anything you like, hit the save button, and voila—your announcement will appear triumphantly in the promo bar.
If you want, you can turn off the promo text (presumably so you can replace it with something else, such as an email form) or turn off the promo bar entirely by clicking on the Promo Bar button in the Promo Skin Display Options, and then un-check the appropriate option(s).
Tabbed Posts
The tabbed posts feature is Nina’s most-requested freelance item, and she decided to add it to the Promo Skin so you could enjoy this functionality, too.
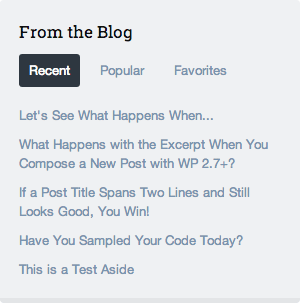
By default, the Recent tab shows the 5 most recent posts from your blog, and the Popular tab shows the 5 posts with the most comments and trackbacks. The Favorites tab can display 5 posts from any category of your choosing.
To select a Favorites category, click on the Tabbed Posts link in the Promo Skin Content list, and then choose a category from the dropdown selector. If you like, you can also change—or eliminate—the “From the Blog” text on this page, too.
Finally, if you’d like to remove the tabbed posts feature altogether, you can do that by clicking on the Miscellaneous button in the Promo Skin Display Options, and then simply un-check “Tabbed posts in sidebar.”
Social Media Profile Links
As the name implies, the Promo Skin is not only good for promoting your best content, but also for promoting yourself!
Thanks to a special Social Media Profiles Box, Promo gives you an easy—and sexy—way to link to your Twitter, Facebook, Google+, Instagram, Pinterest, and YouTube profiles. In addition, this Box can link to your Tumblr page and your RSS feed URL.
To set up the Social Media Profiles Box, visit Thesis Admin → Boxes → Promo Social Media Profiles. From here, you can enter your profile links in the various fields. Any profile links you enter will be available for display in up to 3 locations within the Skin: header, sidebar, and footer.
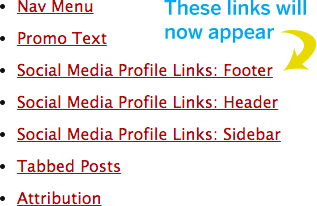
Once you’ve entered (and saved) the social media profile links that are relevant to you, visit the Skin Content page, and you’ll see three new links for your social media profiles. Click on any of these links to select which profile links you’d like to show in the various locations throughout the Skin.
After saving your profile settings, be sure to check out your site so you can see your new profile links in all their glory 😀
Header Image/Logo
The Promo Skin supports a logo via the Header Image functionality, which you can access by visiting Thesis Home → Skin → Header Image.
By default, the Promo Skin will recommend a logo that is no larger than 300 pixels wide, but you can actually insert any size logo you want. (Obviously, you don’t want to insert a logo that is too wide, though, because it could interfere with your navigation menu.)
Pro tip: For best results, we recommend using a .png image with a transparent background.
Widget Areas
Out of the box, the Promo Skin contains 3 widget areas—sidebar, after post, and after page—but only the sidebar area is enabled (and visible in your design) by default.
You can add widgets to these areas in the normal location within WordPress: Appearance → Widgets.
If you’d like to enable the after post and after page widget areas in your design, simply visit the Skin Content page, and click on the Widgets button in the Promo Skin Display Options area. From here, you can check the widget areas you’d like to enable, and then be sure to hit the save button to activate them.
Simple Design Customizations
Out of the box, the Promo Skin comes with simple design options you can use to modify the layout, color scheme, and fonts. With these point-and-click controls, you can perform significant—and gorgeous—customizations to get your site looking precisely how you want.
You can access the design options by visiting Thesis Admin → Skin → Design.
In some cases, you may wish to perform customizations that cannot be achieved from the design options alone. This is where Thesis’ excellent Custom CSS Editor comes in handy—you can modify anything in your design from the Custom CSS Editor.
To access the Custom CSS Editor, visit Thesis Home → Skin → Custom CSS.
Custom Templates
In addition to standard Skin templates, Promo comes with 4 custom templates you can use to create unique, purpose-built pages for your site.
In addition to a landing page template, you’ll get a full page template along with centered post and page templates.
Integrated Thesis Email Signup Form Boxes
In addition to the features listed above, the Promo Skin also comes with design support for Thesis Email Signup Form Boxes.
What does “design support” mean?
It means if you drop a Thesis Email Signup Form Box into your templates, then it will come out nicely styled—and responsive—in the context of the Promo Skin design.
(If you’ve ever attempted to integrate email signup forms into a theme before, then you know how valuable this kind of support truly is.)
Out of the box, the Promo Skin supports email signup forms in three locations: content column, sidebar, and inside the header promo bar.
If you drop a Thesis Email Signup Form Box into any of these locations in your templates, it will come out beautifully styled. Best of all, you won’t have to deal with the headache of integrating the forms into your design, and you won’t have to settle for something that doesn’t look perfect.
And finally, if you use an email campaign provider that we haven’t built a Box for yet, then you can contact Customer Support for help with integrating the forms into your design. (We’ve made this extremely easy, too.)