
If you’re using your website for business, you should track your website conversion rates.
Not only does it tell you what’s working and what isn’t, it also gives you specific goals to take action on.
For example, you may notice that traffic coming from a blog like DIYthemes converts higher than another blog. If that’s the case, you can focus on the source that converts.
How do you track conversion rates on your website?
Luckily, with Google Analytics, it’s easy. So keep reading and I’ll show you:
- How to Set Up Google Analytics in Thesis
- How Track Aweber or Mailchimp Subscriber Conversion Rates with Google Analytics Goals
- How to Track Your Sales Using E-Junkie and Paypal Buttons.
Ready? Let’s dive in.
How to set up Google Analytics in Thesis
Before you start tracking conversion rates, you must make sure Google Analytics is set up and running on your site. Fortunately, this is easy to do with Thesis.
When you sign up for Google Analytics, they’ll give you a tracking code. Copy this code from your Analytics account, and then paste it into your Stats Software/Scripts box under Thesis > Site Options Menu.
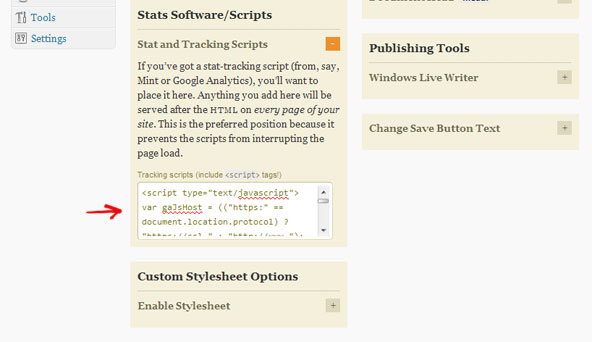
Paste Analytics Code in Thesis Options
Now, once you have your tracking code installed, we can get to the fun part!
How to Track Newsletter and Product Conversion Rates with Google Analytics
When people subscribe to your newsletter or buy your products, you often send them to a thank you page. Most newsletter and product delivery services offer default “Thank You” pages, but I suggest you create your own on your site—one thank you page for each product / newsletter works best.
Step 1: Set up a “Thank You” Page
How do you create custom “Thank You” pages?
Create a normal WordPress page, and make sure you exclude it from your navigation. On this page, you can say “Thank You” to your customers for buying or subscribing to your newsletter. You can also offer bonus downloads or product up-sells here, which is a great strategy by the way.
After you’ve created your pages, I’ve found that it’s useful to copy the page’s URL and paste it into a text file so that it’s easily accessible for the following steps.
Step 2: Tie Your “Thank You” Page To Your Newsletter or Sales Provider
Before I start, I have a quick note…
If your newsletter is powered by Feedburner RSS to email, you should get a premium provider. It’s super valuable because it provides additional stat tracking, and additional features. (if cost is a problem, use MailChimp. They’re free up to 2,000 subscribers).
On to the tracking!
How to Set Up a “Thank You” Page in Mail Chimp
- Log into your mailchimp account and go to your lists page.
- Select the little link that says “forms” under the list you want to track your newsletter subscribers from.
- You should now see a drop-down selection box near the upper left with the title “forms and response emails.” From that drop-down box select “Confirmation ‘thank you’ page”.
- In the input text box below that called “Instead of showing this ‘thank you’ page, send subscribers to another URL”, paste in the url of the “thank you” page that you set up.
- If you’re using the form embed option to put the newsletter form on your site’s sidebar, you’ll need to do a few more steps:
- Click on the link that says “create embed code for small form”.
- Configure the form to match your site how you please, but make sure to click on the checkbox that says “disable all javascript”. This step is important because if you skip it, your subscribers will not get redirected to your “thank you” page and you won’t be able to track them. Instead, they’ll get a confirmation message directly underneath the form.
Input your url into Mailchimp settings
How to Set Up a “Thank You” Page in Aweber
- Log in, go to Webforms, and select the form you’d like to modify.
- Click on the large Settings tab at the top.
- You should see the second option that says “Thank you page.” Select the custom page option.
- Enter the URL of the “thank you” page that you set up.
Input your url into Aweber settings
How to Set Up a “Thank You” Page in E-junkie
Setting up E-Junkie is tricky since there are a few different variables. For the purpose of this tutorial, I’ll show you how to set up a general “thank you” page for simplicity’s sake.
- Log into your E-Junkie account and click on Seller Admin > Edit Account Preferences.
- Place your “thank you” page URL in the input box next to: Common Thank-You Page HTML.
Input your url into E-Junkie settings
How to Set Up a “Thank You” Page In Paypal
- Log into Paypal and go to Profile > More Options.
- Click on “My Saved Buttons” assuming that your button is already saved.
- To the right of the button you want to modify, click on Action > Edit button.
- Now, you’ll want to click on the heading for the third step: Customize Advanced Features.
- Check on the box that says “Take customers to this URL when they finish checkout” and input your thank you page url.
- After you have saved your changes, get your new button html and re-paste it into your site.
Input your URL into Paypal Button settings
Step 3: Set Up Goal Tracking in Google Analytics
Setting up goals in Google Analytics is a fairly straightforward process once you know how to do it. Have no fear!
- Log into your Google Analytics account and go to the website profile for your site.
- Click on the “edit” button to the right of your site link.
- You should now see an area if you scroll down a little called only “goals”. Click on the first link on the right to “add goal”.
- Once there, name your goal. I named mine “subscribers”. Under Goal Type, select “URL Destination”.
- After that, you should be given more options to input your “thank you” page information. Under “match type” select “exact match” and input your goal url as “/thank-you/” if your whole url was
https://mysite.com/thank-you/ - If you want to track sales, you can additionally input the value of your average sale too (win!).
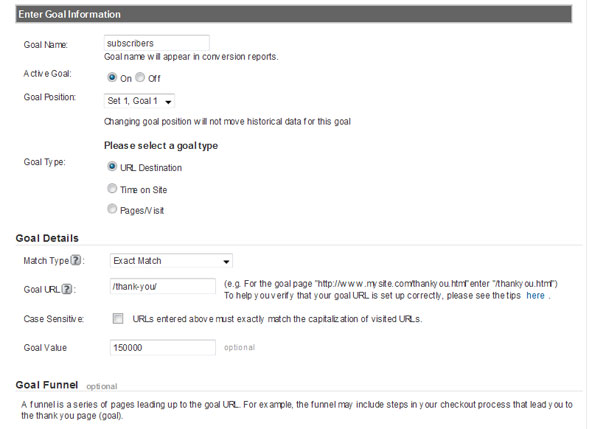
Set up your goals in Google Analytics
You’re All Set!
You should start seeing your results coming in around 24 hours after you set up your goal. Keep in mind that Google Analytics doesn’t track in real-time so you have to be patient.
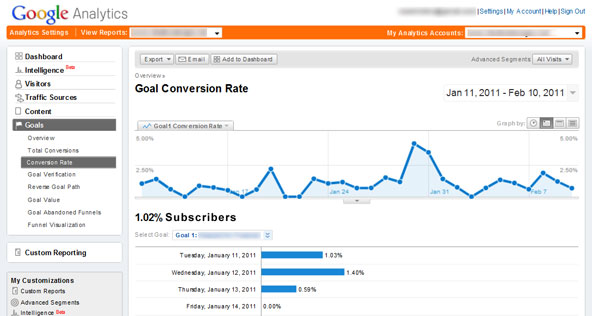
Monitor your conversion rates!
You’ll find your general results underneath the Goals tab on the bottom left of your dashboard. If you don’t start seeing results appearing after 1-2 days, go back through the steps and to double-check that you input everything correctly.
Make sure you keep an eye on your rates and look out for trends. You just might discover you never want to be blind about your conversion rates again!