Did you know? The WordPress Media Gallery includes a handy image editor you can use from the comfort of the WordPress Admin.
Great — but say you’re looking at a photograph you took over the weekend. How to go from a large, unedited image located on your computer to a cropped, resized, and possibly even flipped or rotated final image to use in your pages and posts?
The “how to” of WordPress image editing is the focus of this tutorial.
First, the image on your computer needs to be available as an image on your remote host server. In other words, WordPress needs server-side access to the image so it can make and save changes.
Uploading an image — or images — is easier than ever in recent versions of WordPress.
Presuming you are logged into WordPress, navigate to: Media > Add New.
You should see a screen like this one:
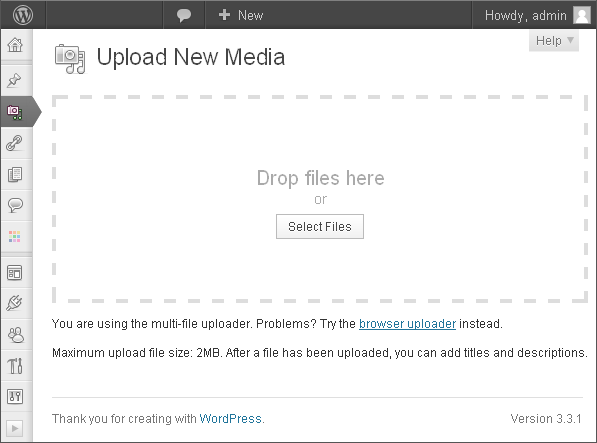
Uploading new media — for this guide, an image — can be done in various ways.
If you know your image is larger than 2MB, or if a set of images, combined, will exceed the maximum filesize allowed, you’ll need to use an alternative to the “Drop File Here” drag-and-drop method.
We’ll assume your original image is under 2MB, which means you can simply drag the image from your desktop directly into the dotted-border area of the WordPress Media Uploader.
Large uploads may take a while to reach the server, but there’s a progress indicator to keep you informed as to your image’s progress.
Once your image is uploaded, you’ll see a screen like this in WordPress:
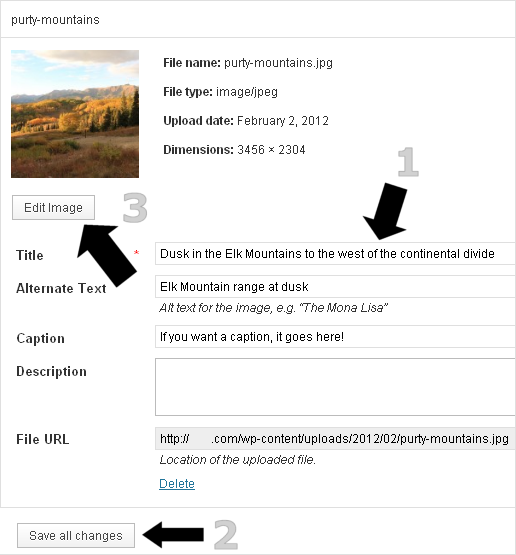
Because the focus of this entry is on using the WP image editing controls, we’ll gloss over — arrows 1 and 2 — adding a title, alt text, description, and captions.
Add these as desired and save them — for our purposes, we’ll eventually click “Edit Image” as marked by arrow 3 above.
Clicking the “Edit Image” button produces an overlay screen; this is the heart of the WordPress image editing software.
With an image uploaded, your WP image editor interface will look like this initially:
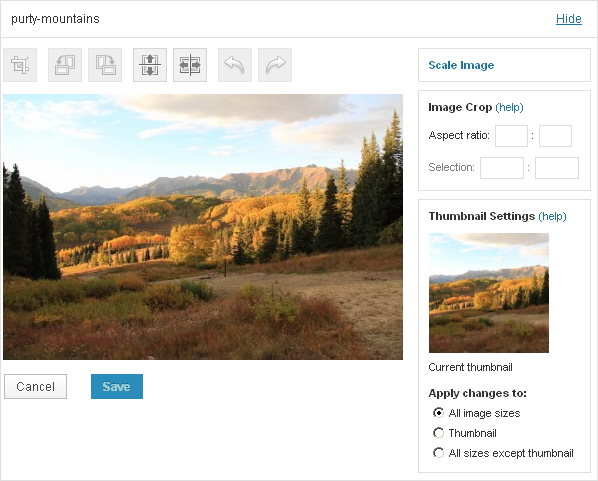
There are four primary actions near the top — crop, rotate left or right, flip (mirror), and the ever-important undo/redo pair of commands.
To the right are commands related to scaling, aspect ratios, and application of the edits you make — effectively, these options dictate whether your editing applies to the thumbnail version of your image, the non-thumbnail version(s) of your image, or to all versions of the image.
Note that in this context, the “thumbnail” is the WordPress thumbnail, which is not the same as the thumbnail images used (default) by Thesis.
Image Editing in WordPress — Selecting & Cropping
Making a “selection” — a rectangular area on the image that is smaller than the full image — is a common way to adjust the aspect ratio (skyscraper, square, wide rectangle) by eye.
In most cases, once you’ve made a selection, the next step is to crop to the selection, reducing both the image size in pixels and kilobytes.
A left-click with your input device, followed by a “dragging” movement while holding down the left-click button or equivalent, will result in a rectangle of the size and shape that is determined by when and where you release of the input button.
Once you’ve made a rectangle, your image will have a selected area such as this:
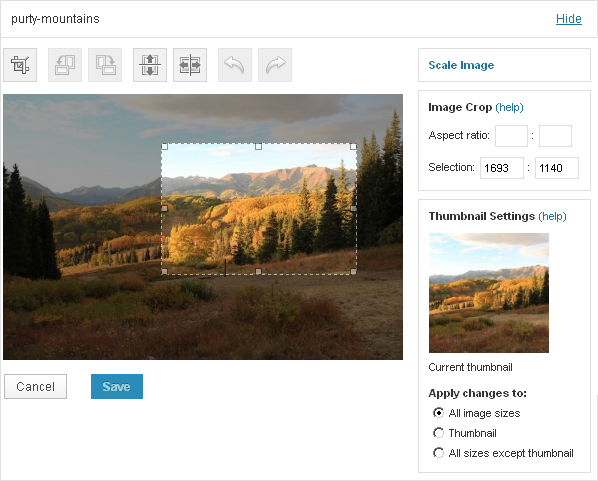
Because the original image of this tutorial’s example is quite large at 3456px wide, the selection — while only about half the size of the visible area — remains fairly large.
The value of the selection in pixels (1693 x 1140) can be seen at right — this is the “Selection” value pair.
While some WordPress site owners may wish to have large images for use in a lightbox, attachment gallery pop-ups, infographics, or other specialized purposes, for the most part, if you’re using an image in the context of a typical “content column” post or page, then 800px or less would be a typical width.
For comparative purposes, this tutorial’s content column is 616 pixels wide. Our image selection is therefore currently almost three times larger than we’d need it to be if this image were intended for use in this User Guide content column.
Because the size of desired image is often less than that of the original image size, cropping is a common “next step” once a selection has been made.
In our example, the vantage from which the image was captured moves downhill and to the left, and contains a large grassy foreground and a walking path — we’ll say goodbye to that.
The selection rectangle, once it is visible as in the above screen capture, can be dragged and manipulated.
As a result, being “off” by a few pixels when you release the mouse is no problem. Simply grab the brighter-toned selection rectangle, and drag it around to move it into a desired position on your original image.
Among the icons along the top of the WordPress image editing panel, the “crop” icon is the first.
With our image reduced to a selection of 1693:1140, clicking the “crop” icon results in the same WordPress tools and image editing appearance we had initially, but our image has been trimmed to size by the cropping action.
Not shown as an image in this tutorial is an “are you sure?” save or cancel step. Saving your edited image brings (you) the WordPress user back to the “Upload New Media” screen. There, you can again click “Edit Image” to continue image modification.
Clicking “Edit Image” after our cropping action, we now see this:
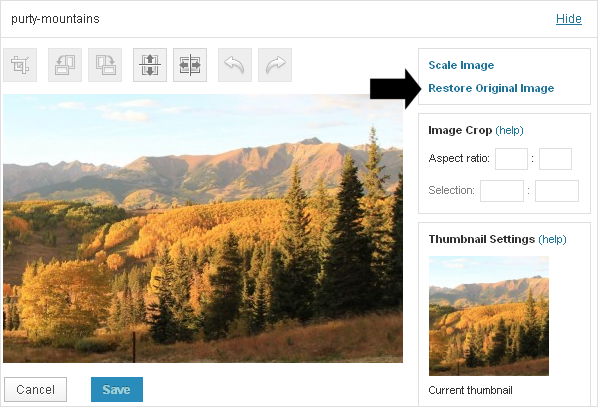
What was previously our selection is now the whole image. If the Save/Cancel step wasn’t a deterrent to an image accident, there’s a link (arrow above) to restore the original image.
Image Editing in WordPress — Aspect Ratios
Every image has an aspect ratio.
All an aspect ratio really is, in WordPress, graphics programs — even on your television — is the image width divided by the image height.
The aspect ratio tool within the WordPress Image Editor is useful in quickly adjusting your image to optimize your use of whitespace, and helps calculate a natural feel for text-wrapping interactions of the image, as well as other spatial concepts of this kind.
Sound hard?
Let’s do some math to prove it’s okay.
A square is the same on all sides, so pretending we have a square that is 500×500 pixels, the aspect of the square is 1:1 — wonderful, simple baby math, not some horrible flashback to cramming for trig finals.
Common “wide not tall” rectangles might be a 2:1 or 3:1 aspect ratio. Many “widescreen” televisions and computer monitors are 4:3 or 8:5 aspect ratio, for example.
Rotate the “widescreen” rectangle on its side, and you have a “skyscraper” image — an image taller than it is wide — where common aspect ratios for “tall” images are 1:4, 1:3, 1:2 — etc.
The point in discussing aspect ratios abstractly is that you may discover you like a handful of specific ones for use in your posts.
As a Thesis user, let’s say you like your “post images” at an aspect ratio of 5:1, every time, where an example would be 500px wide by 100px high.
But in your post content, left- or right-aligned images look better to you as either squares (1:1) or mini-skyscrapers (1:2) most of the time.
Your preferred ratios may come from experience, examining the relational widths of your columns, the size and face of your font, various margin and padding settings, split-testing results, focus groups — or maybe you just like it that way, back off already!
Whatever your reasons for aspect ratio preferences, The WordPress image editor takes the annoyance of “I think it looks okay” aspect ratio guesswork on an image-by-image basis, making it very easy to get the precise ratio you want for your images time after time.
We’ve already cropped our image once “by eye” to remove unwanted portions of the image.
By selecting some or all of the remaining image — effectively preparing another cropping action — and then typing “2” and “1” into the right-side “Aspect Ratio” area, as seen below, the WP image editor works its instant image magic:
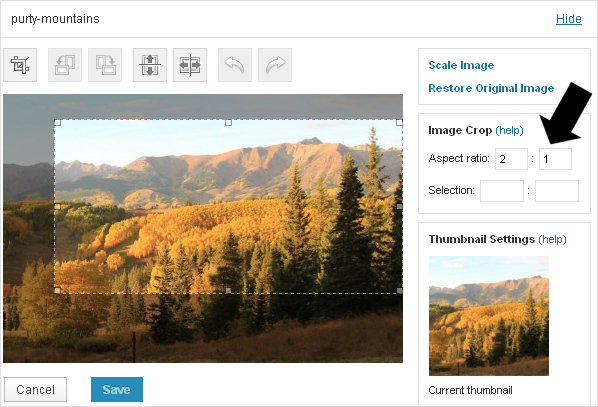
No guessing. No finger-counting math.
You’ve got an aspect of 2:1 (easily changed if desired) — and you can drag that aspect ratio “box” around on your image to decide the best area for the image crop.
The values in pixels of your “Selection” will also appear once you’ve made a selection and establish a desired aspect ratio — remember, it’s important to keep your image wide enough in pixels to fill the ultimate destination.
In the screen capture below, the selection area is 114 pixels wide by 457 pixels tall — a “skyscraper” with an aspect ratio of 1:4.
This is wide enough to work within the content of a post, provided there’s enough text to wrap around and exceed the height of this fairly “tall” image.
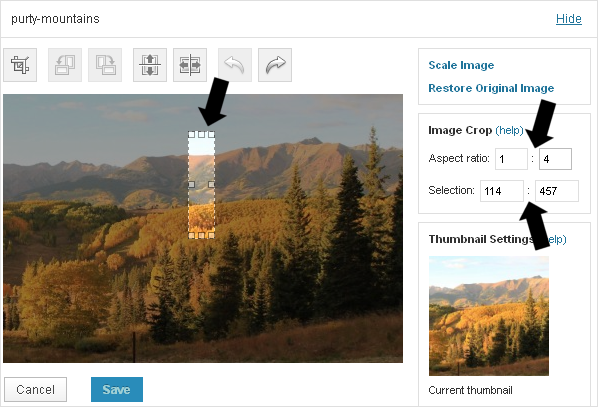
Using an aspect ratio to get close to the desired width-height relationship for your image, you can then dial-in your exact values with the “Selection” numbers if needed.
For example, say you want an image that is exactly 100 pixels wide.
By choosing the aspect ratio of 1:4 and going from our original “mouse dragging” selection, our image is now 114 x 457 px — however, you can change the “Selection” number to “100” instead of “114” — and then simply save the changes.
The aspect ratio will not dynamically reflect a manual adjustment of the “Selection” height or width, and vice-versa.
In other words, if you set a 1:4 aspect ratio, then change the image “Selection” width value from 114px to 100px, the aspect ratio will not reflect this change. But here’s a tip — if you move the “selection area” slightly, these fields will update!
As with cropping, if you’re done choosing an aspect ratio and/or entering a custom “selection” value, save your image.
While Thesis thumbnails are not equivalent to the “thumbnail settings” in the WordPress Image Editing panel, if you use WP thumbnails through plugins or custom code, ensure that your actions do not fall short of the minimum desired thumbnail dimensions while cropping images to a selected area.
Image Editing in WordPress — Rotation & Flips
For various reasons, some features of the WordPress Image Editor may not be available on all servers and hosts. In creating this User Guide entry, rotation was not an available action. Apparently the function imagerotate() was on unscheduled vacation.
Assuming these functions all work on your host, knowing the difference between rotation and flips, in the context of image editing, is probably self-explanatory, but as it’s important to know, let’s take a deeper look.
Each of these four icons represents a calculation of a line turned around an axis.
![]()
That sounds much harder than it truly is; let’s talk through the basic idea.
The axis for image rotation is a point in the center of the image — as a thought exercise, imagine jabbing a sharp pencil into the center of a sheet of (physical) paper. You could then rotate that piece of paper like a wheel around the pencil’s point.
Flipping, on the other hand, uses an invisible line — this is the axis — directly through the center of the image. It then “flips” a reflection along that axis (a flip can also be called a “fold-down” or a mirror action).
Rotation, which is simplified in the WP image editor compared to most offline image editors, is limited to adjustments of 90 degrees — right angles. Rotations can be made to the left or the right, i.e. clockwise or counter-clockwise.
A common use of rotation would be to change a photograph of a person “lying on its side” (landscape) to be oriented as a “right side up” (portrait) image.
Horizontal Flip is a reflection of your image along an invisible, vertical axis or line in the center of the image.
If you begin with an image of an arrow pointing right, then applying a horizontal flip will make the arrow point left.
Vertical Flip is a reflection of your image along an invisible, horizontal axis or line in the center of the image.
If you have an image of an arrow that’s pointing up, applying a vertical flip will make the arrow in your image image point down.
When and why would you flip an image?
Taking the same mountainside image we’ve used throughout, and presuming a reversion (Undo action) such that we start from this:
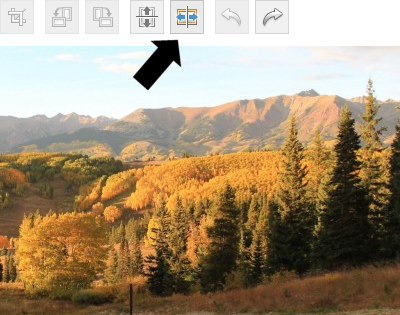
Notice that the slope of this image runs downhill from the right to the left.
The human eye follows image contours of this kind, often subconsciously.
If this image were placed in the content of a post — and if you want your visitor’s eyes to track down and to the right — then as the image stands now, your visitors scanning from top to bottom will “run their eyes right off the page” thanks to this image.
Do images make a difference in conversions and user behavior? Science says yes.
While your visitors will quickly adjust and recover from “off-roading” of this sort, once back on course, the visitors’ eye is less likely to swing to your intended actions.
So in our example, had the image been “pointing” to another on-page section — a call to action, a button, a link, etc — conversions would rise slightly if the image were flipped.
Using one of the functions examined above — a horizontal “flip” — corrects the direction of the eye-tracking.
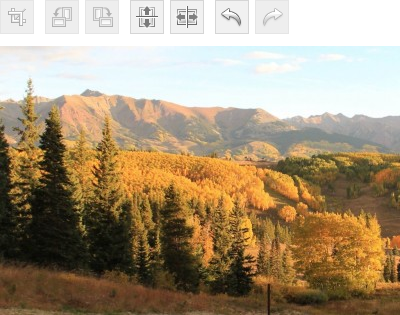
While you can select a section of the image, flipping is an “all or nothing” action — the whole image is reflected, regardless of your selected area.
Assuming that everything else is as you want it, your image has now been cropped, cropped again to an aspect ratio that will be harmonious within the greater context of your site, flipped to “point” the user’s eye in subtle ways to content or actions of your choosing, and you’re ready to insert the image into your posts or pages.
While the WordPress Image Editor is not equal to programs such as Adobe PhotoShop, it provides a clean, simple interface to perform the basic actions most commonly needed to work with WordPress images.
Enjoy taking the WP image editor for a spin!