Is there such a thing as a “perfect blog post?”
The answer is “YES!”
There are 9 essential elements of what I call “the perfect blog post” and each element serves a specific purpose.
(The fact that each element is backed up by psychological, conversion rate optimization, and typographical research is a bonus!)
It’s a revolutionary idea, and you’ll LOVE IT.
What is the perfect blog post… and how can you create it?
Well, if you’re using Focus and WordPress, it’s EASY, and right now I’m going to show you exactly how to do it.
What Is The Perfect Blog Post?
Before I take you through the steps for creating the perfect blog post from a technical standpoint, you’ve got to know what you’re creating, right?
Right.
Here’s the image (if you can’t see it, see the full version of “the perfect blog post.”):

As you can see, the specific sections of this blog post that require some “technical know-how” are as follows:
- the half-width image (gotta be able to align the image right)
- the sub-head
- the soundbite
- the call to action at the bottom of the blog post
Some of this is as easy as including some html in your blog post, whereas the final piece, the call to action at the bottom of the blog post, will require you to mess with some code (but don’t worry, it’s easy and we’ve got a tutorial for it).
So, on that note, let’s walk through it…
How to Create the “Perfect Blog Post”
There are 9 components, 4 of which require some technical know-how. Some of it is as easy as a few html tags, others require a few more steps.
No worries though, it’s easy!
1. How to create the half-width image in Thesis
While I call it the half-width image, I don’t actually use 50% width. In reality, I use around 33% width. So, for example, if your content column is 600 pixels, I’d use an image that’s around 200-250 pixels wide.
To create that image, you’ve got to use an image editing program (or the WordPress image editor). Once you’ve got the image, all you have to do is this:
<img src="imagefilehere" class="alignright frame" title="yourtitle" alt="youralt"/>
The key part of this is the class=.
As you can see, it says alignright, and frame. If you’re not sure when you should use a frame, read about when you should use a frame on your images.
2. How to create the sub-head
I know this likely goes without saying for a lot of you, but surprisingly enough, there were some people who did not know what I meant by sub-head.
So, as a quick refresher, a sub-head is a sub-heading. To create that, all you need to use is the <h3></h3> HTML tags.
Simply surround your text in the h3 tags and you’ll be set. Sub-head created!
3. How to Create the Soundbite (better read as tweetable)
This part is KEY.
I’ve written about the importance of soundbites before, but as a quick refresher, here’s the deal:
People LOVE to share quotes on Twitter. When you give them a quote to share, you’re giving them exactly what they want to share.
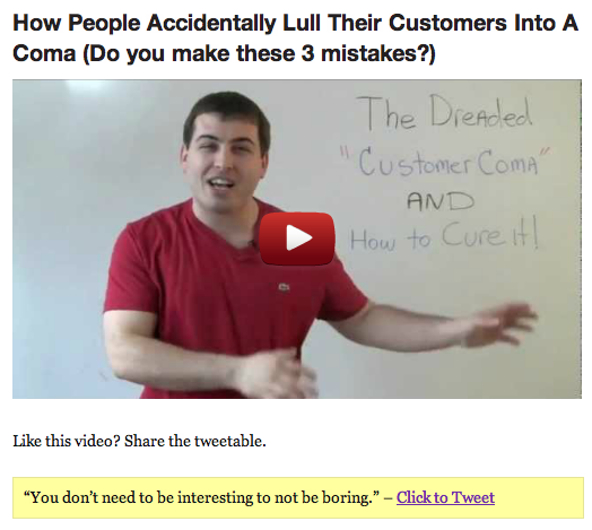
My friend Pat Flynn tested out this soundbite method, and he noticed that 800 people clicked his “click to tweet” link.
When I’ve used it, I’ve had similar results, too. For example, in one article, I put a simple quote below my video “You don’t have to be interesting to not be boring” and loads of people shared that on Twitter too.
Here’s what that looked like:
Now as you’ll notice that I use the soundbite inside of a yellow box. To create the yellow box, all you have to do is add class="alert" to your paragraph tag.
This looks like this:
<p class="alert">"You don't have to be interesting to not be boring"</p>
Why does that happen? Well, in Thesis, “alert” is a default tag that creates that little yellow box. If you don’t want the yellow box, you can use class="note" for a gray box.
Now, the question is, how do you create that little Click to Tweet Link?
You have two options. You can use a website that creates the Click to Tweet link for you, or you can create it by hand.
Quite frankly, I recommend you create it by hand because if you use the website, and that website disappears, all of your click to tweet links will become broken, and that can become a major headache.
How to Create the Click to Tweet Link by Hand
When you click the click to tweet link, here’s what the URL will look like in your URL bar:
https://twitter.com/intent/tweet?text=You+dont+need+to+be+interesting+to+not+be+boring+-+http%3A%2F%2Fbit.ly%2FGDZG3w
As you can see, constructing this URL is quite easy. All you have to do is add what you want your tweet to say after text=
But you can’t just type it any format..
Since you’re constructing a URL, you’ve got to encode the symbols so that your browser knows to add the correct symbols into your tweet.
For the purposes of a URL, you’ll need to encode both your / (back slash), : (colon), and your spaces between words.
(Note: If you decide to use any other symbols, symbols like a ” (quotation) or ‘ (hash mark) you’ll need to encode those too. However, I recommend you don’t use any other symbols in your tweet text to make this as easy as possible)
How do you encode the colon, back slash, and spaces?
The colon is %3A
The slash is %2F
The space is +
Then, when you’re constructing your tweet, all you have to do is take your regular tweet and replace that.
So, for example, lets say you wanted to tweet:
You do not have to be interesting to not be boring – http://bit.ly/GDZG3w/
You’d take the above text and replace all the necessary pieces, and it would look like this:
You+do+not+need+to+be+interesting+to+not+be+boring+-+http%3A%2F%2Fbit.ly%2FGDZG3w
Then, you’d simply add that after the text= portion of the url.
first part of url: https://twitter.com/intent/tweet?text=
second part of url: You+do+not+need+to+be+interesting+to+not+be+boring+-+http%3A%2F%2Fbit.ly%2FGDZG3w
And here’s what it looks like together:
https://twitter.com/intent/tweet?text=You+do+not+need+to+be+interesting+to+not+be+boring+-+http%3A%2F%2Fbit.ly%2FGDZG3w
Then, you’d simply create a normal link in your WordPress editor, and link to the above URL as you just constructed.
What would that look like?
This:
<a href="https://twitter.com/intent/tweet?text=You+do+not+need+to+be+interesting+to+not+be+boring+-+http%3A%2F%2Fbit.ly%2FGDZG3w" alt="You don't need to be interesting to not be boring" title="You don't need to be interesting to not be boring">Click to Tweet</>
And bam.
You’re done!
It looks a lot more complicated than it really is, trust me ;-).
How to Create the Link with the Click to Tweet Website
There’s a website called ClicktoTweet.com that makes creating these links MUCH easier, but the problem is, it creates a short URL.
Whatever you do, don’t use that short url that they create for you. Instead, add that short url into your URL bar and grab the link to the twitter url that it redirects you to.
Then, link to that url. To see what I’m talking about, do this:

See how you type your text into the website there?
When you do that, click “Generate Link.”
Then, take the link it creates for you, and add it into your url bar… and load the website.
Then you’ll see that it redirects you to a ready-made Twitter link that you can use in your blog post.
As an example, take a look at this link here: http://clicktotweet.com/2T1A0
See how it redirects?
Don’t use the ClicktoTweet url. Instead, use the URL that it redirects to when creating your link.
That’s a bit easier to stomach than creating the URLs, but again, once you get the hang of making the URLs, it gets easy. Trust me :-).
How to Create a Call to Action at the Bottom of a Blog Post
Why do I LOVE a call to action at the bottom of a blog post?
Think about it…
If people read an entire article on your site, they often look for what they can do next, right?
Right.
Now you could place any kind of call to action here… like a link to a landing page… or what I prefer to do (as you can see here on DIYthemes and on Social Triggers) is add an opt-in form because it converts well.
Remember, one of the best ways to build your business AND blog is by building your email list.
Question is, how can you add an opt-in form at the bottom of your blog posts?
In Thesis, it’s extremely easy. All you gotta do is add this code in your custom_functions.php file:
function afterpost_email() {

if (is_single()) { ?>

PASTE YOUR EMAIL SIGN-UP FORM CODE HERE

<?php } }

add_action('thesis_hook_after_post' , 'afterpost_email');
The Bottom Line
Now I’m sure there are people who will debate whether or not this is the perfect blog post, but here’s the deal:
The point of this blog post is to encourage people to read the blog post in its entirety while also encouraging people to share it on social media and subscribe to a newsletter.
And right now, based on my experience, there’s no better way to create a “perfect blog post.”